はじめに
Azure Active Directory Managed Service Identity(MSI)というサービスがプレビューになりました。AWSのIAM Roleのように、コードの中に認証情報を保存しなくてもAPIにアクセスするためのトークンを得られるサービスです。ぐっときたので試しました。
Keep credentials out of code: Introducing Azure AD Managed Service Identity
Azure CLIを使ってMSIを設定する
9/15現在、私のポータルにはMSIの設定画面が存在しません。そのため、Azure Cloud Shellを使って設定します。
Configure a VM Managed Service Identity (MSI) using Azure CLI
$ az vm assign-identity -g myResourceGroup -n myVm
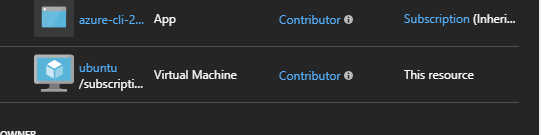
なお、上記のドキュメントのまま設定すると、VMが属するリソースグルプに対して共同管理者ロールを持った仮想マシンが誕生します。共同管理者はリソースの追加と削除ができる特権アカウントです。必要に応じてロールやスコープを変更しましょう。
$ az vm assign-identity -h

Command
    az vm assign-identity: Enable managed service identity on a VM.
        Required to authenticate and interact with other Azure services using bearer tokens.

Arguments
    --port             : The port to fetch AAD token. Default: 50342.
    --role             : Role name or id the managed identity will be assigned.  Default:
                         Contributor.
    --scope            : The scope the managed identity has access to, or specify  for None.
                         Default: VM/VMSS's resource group.

Azure CLIで動作確認
MSIを使ってAzure CLIにログインします。az loginに「–msi」オプションをつけるだけです。サービスプリンシパルの情報をオプションに渡したり、インタラクティブログインのURLをクリックする必要はありません。気軽。
$ az vm list
Please run 'az login' to setup account.
$ az login --msi
[
  {
    "environmentName": "AzureCloud",
    "id": "MY_ID",
    "isDefault": true,
    "name": "MY_NAME",
    "state": "Enabled",
    "tenantId": "MY_TENNANT_ID",
    "user": {
      "name": "VM",
      "type": "servicePrincipal"
    }
  }
]
$ az vm list | jq .[].name
"ubuntu"
$
感想
次のサービスでMSIを利用できます。MSIをうまく使って、コードから認証情報を追い出しましょう。
- Azure Virtual Machines
- Azure Virtual Machine Scale Sets
- Azure App Service
- Azure Functions